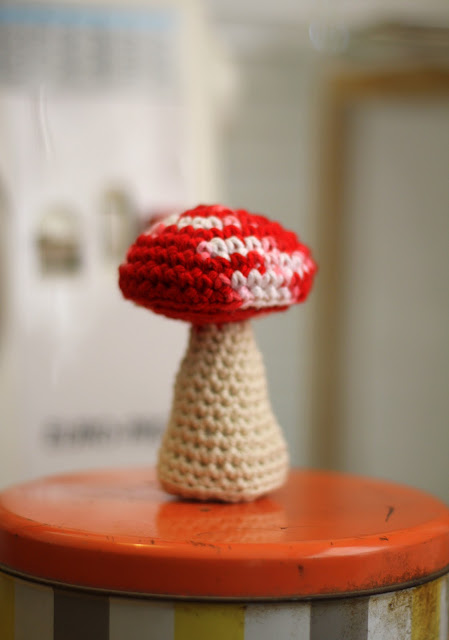
Mini Mushroom Amigurumi Pattern!
I made this little guy as a belated birthday gift for a friend, and I thought I should post the pattern! It's a great beginning amigurumi pattern because if it comes out a little wonky it's fine, because it's a mushroom, and they're all a little wonky in real life, right? I think it would be super cute with white pins in the top too so it can me useful. I was also playing with the idea of doing a "How I Make Amigurumi" photo or video tutorial using this pattern, might be fun... Anywho, if anyone catches any errors in the pattern please let me know!
Mini Mushroom Amigurumi Pattern
This pattern is worked in a continuous spiral, so be sure when you need to skip stitches for decreasing that you skip the very last stitch, which will simultaneously put down the first stitch of the next round, so you'll get the correct number of stitches. It measures about 3 1/2 inches tall when done. There's no guage, just crochet as tightly as possible.
Size US G7 (4.5mm) Hook, smaller is fine.
Peaches & Creme or Sugar & Creme 100% cotton worsted weight yarn in cream and 191 Peppermint
Small amount of batting
5 glass pebbles or rocks
Abbreviations: sc = single crochet, rnd = round, sts = stitches, slst = slip stitch
Start with Peppermint colored yarn.
Rnd 1: Create a magic loop and crochet 6 sc into loop, pull it tight and join with a slst. (6 sts)Rnd 2: 2 sc into each sc around. (12 sts)
Rnd 3: *1 sc in next sc, 2 sc in next*, repeat around. (18 sts)
Rnd 4: *1 sc in next 2 sc, 2 sc in next*, repeat around. (24 sts)
Rnd 5: *1 sc in next 3 sc, 2 sc in next*, repeat around. (30 sts)
Rnd 6: *1 sc in next 4 sc, 2 sc in next*, repeat around. (36 sts)
Rnds 7-8: 1 sc in each sc around.
Rnds 9-12: Crochet into back loop only!
Rnd 9: *sc in next 5 sc, skip 1 sc*, repeat around. (25 sts)
Rnd 10: *sc in next 4 sc, skip 1 sc*, repeat around. (20 sts)
Rnd 11: *sc in next 3 sc, skip 1 sc*, repeat around. (15 sts)
Stuff cap with batting.
Rnd 12: *sc in next 2 sc, skip 1 sc*, repeat around. (10 sts)
Switch to the cream colored yarn.
Rnd 13: In the front loop only for this round: 1 sc in each sc around.
Rnd 14: 1 sc in each sc around.
Rnd 15: *sc in next 4 sc, 2 sc in next*, repeat once. (12 sts)
Rnd 16: *sc in next 3 sc, 2 sc in next*, repeat around. (15 sts)
Rnds 17 -19: 1 sc in each sc around.
Rnd 20: *sc in next 4 sc, 2 sc in next*, repeat around. (18 sts)
Rnd 21: 1 sc in each sc around.
Rnd 22: *1 sc in next 2 sc, 2 sc in next*, repeat around. (24 sts)
Rnds 23-25: 1 sc in each sc around.
Rnd 26: In the back loop only for this round, *1 sc in next 5 sc, skip next sc*, repeat around (19 sts)
Stuff the stem with batting, leaving a little room for the weights.
Rnd 27: *1 sc in next 4 sc, skip 1 sc*, repeat around. (16 sts)
Add weights, and try to distribute them evenly so the bottom lays flat.
Rnd 28: *1 sc in next sc, skip 1 sc*, repeat around (8 sts)
Rnd 29: *1 sc in next sc, skip next sc*, repeat twice, close opening and weave in end.
If you have found this or any of my other free patterns useful and would like to help me keep creating them I accept PayPal donations!


How cute! I think I'll make a bunch of these to ad to my Easter decorations.
ReplyDeleteAww they would be really cute Easter decorations! Guess I got this one posted just in time!
ReplyDeleteSo simple, but so cute! I love this like crazy and want to decorate my whole yard with these. Yes, I am insane, but I can just see it now...
ReplyDeleteHannah you should do it! My S&B group has recently gotten into yarnbombing, and I've always wanted to do crocheted dog poo with big red mushrooms growing out of it, which is waaaay weirder than you just wanting to put them all over your yard! They work up super fast too, especially for a pro like you!
ReplyDelete