Very Tardy Tutorial!
Hi everyone, long time no see! As far as my life goes it's been pretty crazy around here, hence the lack of posts. But I don't want to get into it right now, so instead I will show you my wall of inspiration from fall: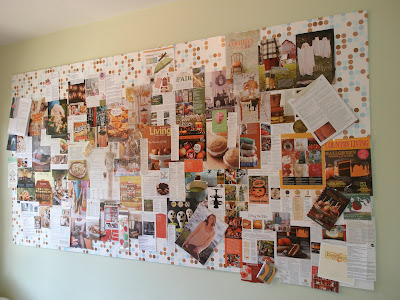 I made this ridiculously large board to pin up all of my inspiring bits that I gather and want to look at all the time. It measures about 9x4 feet and covers almost the entire wall above my bed, so I used foam presentation board instead of cork because it's so much cheaper. I thought I would share how I made it because it was kind of tough and having a tutorial would have saved me a lot of time and effort, and my roomie and I came up with some clever tricks for its construction.
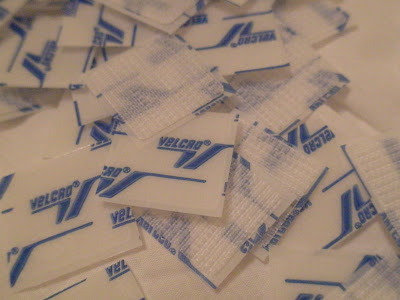 First, you'll need 2 packages of little sticky velcro squares. I chose these because I wanted to be able to replace a panel if it got too many holes in it and they come off the wall cleanly when I will eventually have to move again (don't worry, hopefully that will never happen!). And you'll need 9 pieces of Elmer's foam board, the 20x30 inch ones, color doesn't matter (this is if you're making one as big as mine, you may need more or less depending on the size of your board). You're also going to want a tape measure, a level, a straight edge, an exacto knife, a pencil, and a roll of masking tape. And lastly, you'll need a large roll of self-adhesive shelf liner paper, which comes in so many motifs nowadays that you're sure to find one that matches your decor I have Angela to thank for this brilliant idea: I had bought the liner paper for our cabinets but the finish on the shelves was too rough so I couldn't use it. I was originally going to cover the board with brown craft paper to give it a similar look to the cork wallboards, but it was turning out to be a mess. Then Angela suggested the shelf paper and the pallet was perfect for my room with lovely polka dots in blues and tans.
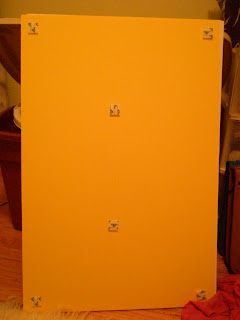 1. To prep the boards, pull apart all the little velcro squares, match up the pairs and stick them together. Then peel of only ONE side of the sticky paper and press the sets onto the corners of all the boards but one. (This is the one you'll be cutting to finish a corner so you'll want to put on the sticky dots after you cut it.)
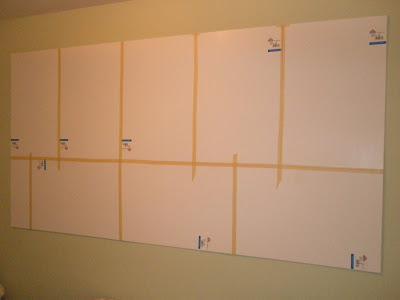 8. Take the masking tape and tape over all of the seams between the boards.
I made this ridiculously large board to pin up all of my inspiring bits that I gather and want to look at all the time. It measures about 9x4 feet and covers almost the entire wall above my bed, so I used foam presentation board instead of cork because it's so much cheaper. I thought I would share how I made it because it was kind of tough and having a tutorial would have saved me a lot of time and effort, and my roomie and I came up with some clever tricks for its construction. First, you'll need 2 packages of little sticky velcro squares. I chose these because I wanted to be able to replace a panel if it got too many holes in it and they come off the wall cleanly when I will eventually have to move again (don't worry, hopefully that will never happen!). And you'll need 9 pieces of Elmer's foam board, the 20x30 inch ones, color doesn't matter (this is if you're making one as big as mine, you may need more or less depending on the size of your board). You're also going to want a tape measure, a level, a straight edge, an exacto knife, a pencil, and a roll of masking tape. And lastly, you'll need a large roll of self-adhesive shelf liner paper, which comes in so many motifs nowadays that you're sure to find one that matches your decor I have Angela to thank for this brilliant idea: I had bought the liner paper for our cabinets but the finish on the shelves was too rough so I couldn't use it. I was originally going to cover the board with brown craft paper to give it a similar look to the cork wallboards, but it was turning out to be a mess. Then Angela suggested the shelf paper and the pallet was perfect for my room with lovely polka dots in blues and tans. 1. To prep the boards, pull apart all the little velcro squares, match up the pairs and stick them together. Then peel of only ONE side of the sticky paper and press the sets onto the corners of all the boards but one. (This is the one you'll be cutting to finish a corner so you'll want to put on the sticky dots after you cut it.)
2. Okay, so now that you have all your supplies, measure the wall you want to put it on and decide on a size for the board.
3. To center the board, take the wall length and subtract the board length, then divide by two. Do the same for the height, and this will be the wallspace left around the board.
4. With the pencil, measure and mark on the wall where the corners of the finished board will be.
5. Now grab a board and line its corner up with the top right corner you just marked on the wall. Use the level to make sure the board is level and mark where the top is on the wall. Flip the board over and peel off all the sticky papers from the back of the velcro squares. Hold the board close to the wall and make sure you realign it with the top level line, then press it to the wall.
6. Take the next board and butt it up to the one you just put on the wall. Check to make sure it's level as well (if not, make it level and if there's a minute gap between the boards it's all right, it'll be covered with masking tape later). Now take it off the wall and remove the sticky paper and stick it to the wall just like the first one.
7. Repeat step 6 until you've reached the desired length of the finished board. Now you can complete the bottom row of board pieces just like the top row.If you need to, trim the board at the end with the straight edge and xacto knife to the correct length and stick on the last velcro squares.
8. Take the masking tape and tape over all of the seams between the boards.
9. (For this step you may want to bribe your roommate with cookies to help you.) Take the length of the board and add 2 inches. Cut 3-4 strips of the shelf liner paper to that length. Peel off the backing at one corner and stick it to the board, leaving an inch of overhang on the side and top. Have your friend hold the strip up against the board while you keep one hand behind the paper, slowly peeling off the backing. Use the side of your other hand to smooth down the paper and remove any air bubbles. Don't keep the tension on the paper too high because it can stretch a bit. When you reach the other end of the board there should be an inch of paper overhanging.

10. Peel and stick the rest of the shelf paper as in step 9 to the rest of the board, overlapping each strip a tiny bit.
11. fold the overhanging paper around the edges of the board, feel free to pull it away from the wall a bit to get it all the way around, just push it back on the wall afterwards. Ah, the wonders of Velcro.
Et voila! Add about 100 pushpins and you're ready to go! Please tell me if any of this doesn't make sense, it's my first tutorial and a complicated one at that. Hope this helps someone out there who wanted a gigantic bulletin board!
If you have found this or any of my other free patterns useful and would like to help me keep creating them I accept PayPal donations!


Welcome back Chase.
ReplyDeleteWhere were you hiding the last few months I wonder. I'm so glad to see your new post and awesome tutorial.
Thanks.
Nice to see you post again, I know life's been busy. ;-) Excellent tutorial btw, I'll have to put one of those around here.
ReplyDeleteYou know, I just realized that the paper on the board matches my blog wallpaper. Ha!
ReplyDeleteSo smart! And it looks great, too!
ReplyDelete