How to Crochet a Basket, Part One.
I have finished everything for the gift baskets, which I will post pictures of tomorrow. First thing, the baskets themselves:

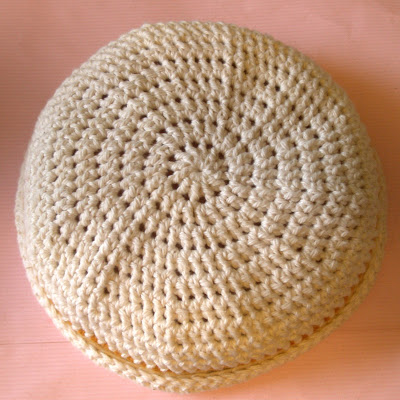


And, as promised, here is my tutorial. This pattern is a quick version of my Kitty Stuff Basket pattern. I made this tutorial for beginners who have a little experience with regular crochet and would like to learn to crochet in the round to make things like this basket, or hats, or amigurumi. This is the way I do it, and since I am self-taught with a little help from my mom and the Internet, I am sure it is a slightly unorthodox way to do it, but if it works for me it might work for others out there who have trouble with traditional methods. This is also how I get seamless rounds. Can you find the join? Actually, I forget where it is too! So let's get started, shall we?

*If you would like to make these baskets but do not need the entire tutorial, click here for the plain pattern!
Materials you will need:
An H hook (5.0mm)
A ball of Sugar and Cream worsted weight cotton yarn in Natural
A small amount of colored yarn or hemp twine for the stripe
Scissors
A tiny crochet hook for weaving in the ends
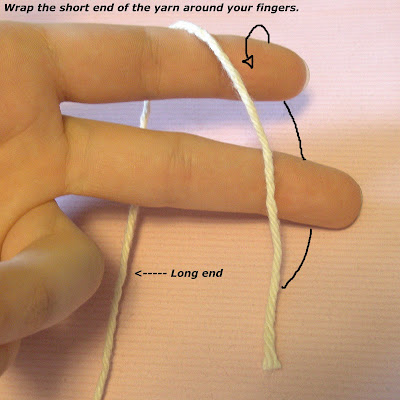
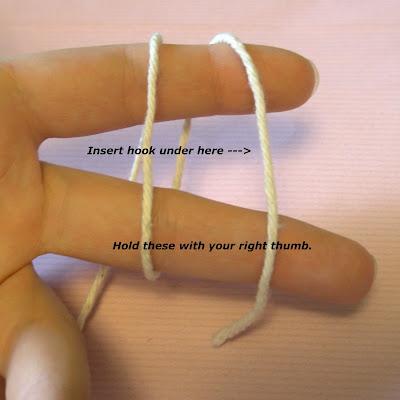
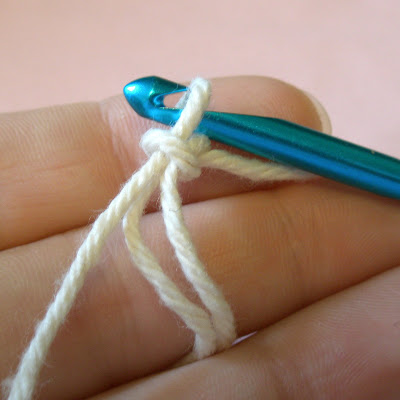
1. First, with the natural cotton yarn, we will make an adjustable loop for the base. A lot of traditional crochet books tell you to make a chain of 4-6 stitches and then crochet into the loop. This method leaves you with a big hole in the center of whatever you're making, and I hate that. The adjustable loop usually takes a couple tries to get it right but when you do you will be so much happier! Here's how we do it:
Lay the short end over two fingers, like this:


Ta-da! This is the magical adjustable ring that will open up a whole world of hats without pom-poms on top to cover up the hole left by the old method! And amigurumis will keep their stuffing in without any extra sewing! *Dreamy sigh.*
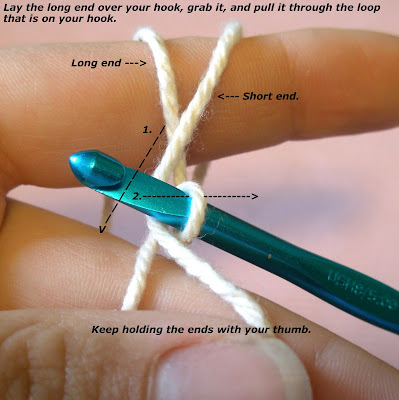
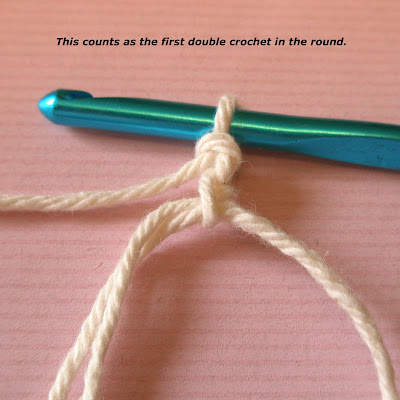
2. Now, we will crochet into the loop:
First, chain 2 as you would in normal crochet. We will be working the entire basket in double crochet, so a knowledge of that stitch is essential.


See, it looks good, right? I get a lot of people asking me how I get my crochet so tight. It's no big secret... First of all, I always keep a pretty tight grip on my long end of yarn, which increases the tension (and incidentally has given me some nice callouses on the insides of my knuckles). When I am making an amigurumi, it is usually all in single crochet, and all I do to tighten it is give the long end of the yarn a good yank when I finish each stitch. This cinches everything up tight. With double crochet, I tug after every time I pull the yarn through 2 loops on my hook, so basically I tug once in the middle of the stitch and once when the stitch is done. That's all it takes. So if your crochet is turning out floppy and loopy, just pull!
Anywho, now that you know how to do a double crochet tightly into the round, do it over and over again until you have 12 altogether (11 plus the initial chain 2). Feel free to squish the stitches to the left as you work, keeps things tidy.


Some Japanese craft books have you work in a continuous spiral instead of joining rounds, but this usually works best for single crochet only and for things that don't need a nice straight edge like this basket, so we will be joining the rounds here.


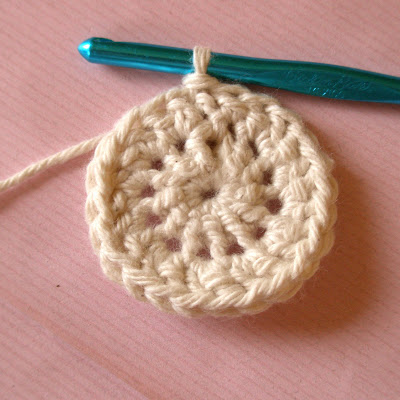
If you know your way around crochet, you will see that the edge of the round looks just like the top edge of straight crochet, with the familiar V-shaped stitches going around:

At this point, this is what your round should look like. Count backwards from the hook to make sure you have 12 stitches. Remember that the loop on the hook never counts as a stitch, but the V it is coming out of does.


I have to say that I absolutely HATE weaving in ends. So I just eliminate them as I go by encasing them in 4-6 stitches and then trimming the excess. That way the only finishing the project needs is to have the very last end woven in. I have to do this or I might not finish anything!
3. So now, onto round 2:
*Here's a note about this chain 2: most traditional crochet instructions tell you to count the chain 2 as the very first stitch in the round, but I find that this messes up my counting and I tend to leave something out. So I prefer to think of that chain as the LAST stitch in the round. Don't count the chain when you start any of the rounds after the first one. Trust me, it will help. So after the chain 2, when you insert your hook into the first stitch and make your first double crochet, count it as number one...


To make the bottom of your basket a flat round, you have to increase the number of stitches in every row by 12. And these have to be evenly spread out or it will be lopsided. There is a very standard and easy way to do this, and here's how you start:

This counts as stitch number two in this round. You will be doing 2 double crochet stitches in every stitch in this round.
*Here's a detail of the short end being encased by your stitch. Notice that when you wrap the long end over the hook to complete the stitch, the short end remains inside the bottom of the stitch. Sounds complicated, but try it and you will see what I mean. The encasing method works great for multi-colored granny squares as well, because you will drive yourself nuts trying to weave in all those ends!

So, if you counted correctly, you should have a nice flat round of 23 stitches, and then this is how you close up the round:


So, if you counted correctly and did that last stitch in the right place, when you count backwards from your hook you should have 24 stitches, which is the original 12 from the first round, plus 12.
4. Now you know enough to finish the bottom of your basket:
For round 3, chain 2 just as before (counts as the LAST stitch in the round), but instead of doing 2 double crochets in every stitch, you do ONE double crochet in the first stitch of the round, THEN you do 2 in the same stitch. This spreads out your increases and your basket will be nice and even. So you make your way around round 3, increasing in EVERY OTHER stitch. Be sure to do the last increase in the base of the initial chain 2, and join the round just as before. Hopefully, when you count your stitches, you should have 36 (the 24 from the last round, plus the 12 you added by increasing).
For round 4, chain 2 and then do ONE double crochet in the first AND second stitches of the round, THEN do two double crochets in the same stitch. Repeat this stitch pattern all the way to the end of the round, then finish it just like the rest, ending up with 48 stitches.
By now, you should start seeing a pattern in the way you are spreading out your increases. For round 5, you would do one double crochet in the first THREE stitches of the round, then do two in the same stitch, and repeat that pattern around until you finish the round and end up with 60 stitches.
For round 6, chain 2 and then do ONE double crochet in the first four stitches, THEN do two double crochets in the same stitch. Repeat this stitch pattern all the way to the end of the round, then finish it just like the rest, ending up with 72 stitches.
For round 7, chain 2 and then do ONE double crochet in the first five stitches, THEN do two double crochets in the same stitch. Repeat this stitch pattern all the way to the end of the round, then finish it just like the rest, ending up with 84 stitches.
*Interesting, though not very important note... Notice that the round number multiplied by 12 gives you the number of stitches in the round? Round 1 x 12 = 12, round 2 x 12 = 24, etc. Also, the round number tells you the number of stitches in the increase pattern: round one, there's only one stitch all the way around. Round 2, there's 2 sitches together that make the increases. Round 3, there's one alone and then 2 together for a total of 3 stitches in the pattern you repeat around. Round 4, there's 2 alone and then 2 together for a total of 4, etc. Confused you yet? I promise that the more you do it, the easier it gets to remember the pattern and the rhythm of the stitches.
Anywho, now you're done with increasing! You should have a nice, big, flat circle. If it doesn't lay perfectly flat and has a bit of a ripple, worry not! You just need to try pulling it tighter next time, but this time around it will get mostly smoothed out as you make the sides of the basket, and after a bit of use (i.e. putting stuff in it), the bottom will flatten out. If it really bugs you or you are making it for a gift, you can always block it when it's all done by getting it damp and putting it over something like a tupperware to help it keep its shape. Let it air dry and voila!
So this is the end of part one, and you can click here to go to part two!
If you have found this or any of my other free patterns useful and would like to help me keep creating them I accept PayPal donations!


So cute! I have wanted to learn to crochet. I can knit but not crochet. I love your step by step pics and instructions!
ReplyDeleteThe real question is, how does it look as a hat? :-P
ReplyDeleteAfter reading your tutorial I finally managed to make a perfectly flat circle, just can't believe it! I'm so happy about it! You can check my basket in my blog, thanks a bunch!
ReplyDeleteThanks for your reply! A friend of mine was telling me why my basket turned up to be higher than yours - I made double crochets instead of half doubles! Gotta try again using the right stitch! Anyways, my crochet skills are not that good and I am happy enough to have been able to make a flat circle, thanks again!
ReplyDeleteAll the best
This idea also works geat for making "can coats, "pop parkas',"soda sweater"or wahtever you wan to call them . Great project for long road trips.
ReplyDeleteWhat sweet little baskets. Thanks for taking the time to show the how to. I love your step by step instructions.
ReplyDeleteKimmie
mama to 7
one homemade and 6 adopted
Great tutorial! I am going to try out your tips - the beginning loop and finishing up the rounds. Thank you for sharing this!
ReplyDeleteThank you for showing the magic loop. I've only been learning for a few weeks and already it has made things much easier!
ReplyDeleteIt was rather interesting for me to read that blog. Thanks for it. I like such themes and everything connected to this matter. I definitely want to read a bit more soon.
ReplyDeleteBest regards
Thank you so much for posting these instructions! I have a baby shower coming up and I wanted to make something personal for the mom - now I can make some baskets for the nursery! Your instructions are so clear and I have already made the first 6 rows of the bottom of thebasket without ny "do overs". AND I started learning how to crochet yesterday! LOVE that I am going to finnish something NICE this soon after starting! LOVE instant gratification like that!
ReplyDeleteVery useful topic
ReplyDeleteI am final, I am sorry, but this answer does not suit me. Perhaps there are still variants?
ReplyDeleteI suggest you to come on a site on which there is a lot of information on this question.
ReplyDeleteI really liked the article, and the very cool blog
ReplyDeletehow many time i do not do what i want to do but do what i dont want to do
ReplyDeleteThank you for sharing
ReplyDeleteI really like
Your pics and detailed instructions are AMAZINGGGGG!!! Thank you so much! I'm a very very new crocheter and I understood all of this! Fabulous!
ReplyDeletei stumbled upon this basket thing today and decided i was going to try it out. so i was watching a couple videos and reading a few blogs, picking out a pattern that was easy to learn from. the loop trick that you start with is probably the most genius way to do that part. i had to start over twice because i messed that part up, then i found your blog and rocked it. thanks for the great trick! and good job with the pictures and diagrams. i usually have to watch a video to learn this kind of stuff 'cause it's easier to see it done than trying to decifer how someone describes the steps, but i was able to keep up with yours without getting stumped. Thanks again! -Amy
ReplyDeleteHi, how many yards does one bowl take. Thanks
ReplyDelete