8/31/2011

It's Etsy Time!


That's right! My birthday was this past Sunday and as a present to myself I decided to get some new owl pincushions listed. The six remaining special edition Hipster Owls are now for sale in the shop! There's also 5 regular owls that will be appearing shortly. I blogged about the Hipster Owls here, because I made them especially for a craft fair I sold at. Also, I just wanted to make sure that you guys know that I now use Twitter a bit more for shop purposes, and I tweet every item I list immediately after. So if you follow me on Twitter you will see when new items go live before anyone else knows! I will keep you posted as I add more new items!

8/30/2011

How-Tuesday #25!

Hi all! I was out of town for last weeks How-Tuesday but here we go for this week! We have leather lanyards, a beautiful bouquet, and yet another peanut butter pie recipe!


Everyone has probably made those bright plastic lanyards at some point in their childhood. Now you can make a grown-up version! Here is the great tutorial.


I love these wedding bouquets made from vintage up-cycled brooches. Check out the how-to here.


I think I already posted a peanut butter pie recipe in the early days of How-Tuesday. But really, can you ever have too many peanut butter pie options? One day I will make a bunch of different ones and see which is the best, even though all of them have been amazing thus far. Here is the recipe.

8/16/2011

How-Tuesday #24!

Hi all! I think I may have missed How-Tuesday last week, probably because I had the day off which threw me all out of whack. Anywho, this week I have cinnamon roll pancakes, ruffled streamers, and as a bonus, a huge directory of sewing patterns.


I am not usually a big fan of cinnamon rolls (sticky buns are another story though). But for some reason these pancakes look effing delicious, yes? Here is the recipe.


There is still time left for one more summer party, and these streamers would be the best decoration! I am obsessed with paper garlands lately, so here is yet another one to add to the to-do list. Here is the beautiful tutorial.


And lastly, I stumbled upon this list of the 100 best sewing tutorials on the web. I may have featured 1 or 2 here in the past, but there are so many more! Check it out here.

8/11/2011

Bead Sale!


Hey everyone! I just listed close to 100 little lots of beads over on my etsy shop. Some of you might remember when I was selling lots of beads on another shop, and then I closed it because I decided I would rather make jewelry with what I had left. But when I was making earrings and such for the craft fair I sold at I realized that I just have way too many. Seriously. Like, more than I could ever use up in my lifetime. So it is time for a good old Destash Bash at Oh the Cuteness! I am starting with the beads, but my fabric shelf is going to get a good going-over too, along with other miscellaneous supplies. I listed the beads for much cheaper than they used to be in The Slug and Lettuce because I just want them gone! Hope there is something special waiting for you.


Oh, also I photographed a bunch of new owl pincushions (along with some other bits and bobs) yesterday, just need to do some light editing and they will be listed this week! Woot!

8/07/2011

New Photography

Lately I have been trying really hard to be better about taking my camera with me and taking lots of photos. I took my camera with me on the trip I took down to Paso on Fathers Day and I got some great shots of my parents which you saw in this post. I also was inspired by this great website, Dear Photograph, to try my hand at some layered pictures from the past, and here are the results:


The last one is my absolute favorite! I had a hard time with the sun setting and I had to get my mom to move the car out of the driveway and wait for me to be done and she was such a good sport about it! And yes, I liked pink and I had a broken wrist. I wanted to do more of these but mom gave me most of the old family photos and these were the only ones I could find of the outside of the house and it was too dark inside. Next time I visit I will bring some more out of my albums and include some other places in town. What fun!

I have a lot of qualms when it comes to my photography, but I have always loved doing it and I am sure it will continue to be a bigger and bigger part of my art. I really prefer film photography, and while I am no expert - not by a long shot - I feel like the best photos I take are film-based. I promise I will take a day to scan all my recent work. That is one great advantage of digital - the fact that it is so easy to share with the world. And I love the way you can customize it, really make it your own. Its hard to take a truly bad photo on a digital camera, and for that reason I think I have a problem with my ability to edit down a collection of shots to get just the best ones... Yet another thing I am working on. I have long aspired to sell prints of my work and I feel like I am finally getting some really good photos done after years of working on my personal style and getting better at post-processing. The following 3 photos, a little series I call Leaving Town, were paired down from a dozen to five, and then to these best three and I am really proud of myself for that. I am very happy with these, so much so that I think I will do a limited run of prints and sell them on my etsy. Soon.


And as usual, you can see the higher-res versions of these on my flickr.

8/04/2011

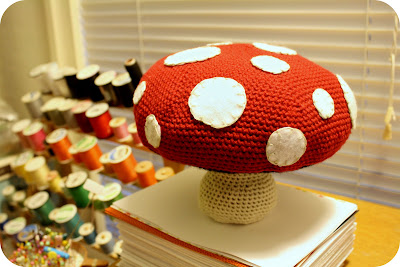
Giant Amigurumi Toadstool Pattern!

Believe it or not I have been making good progress on my list of unfinished projects. This bad boy was one that I had been consistently working on in between other projects for about a year (yeah, I know).


This thing is huge! And I don't know why I decided to make it so ridiculously large; it measures about 8 inches wide by 7 inches tall. I will not be making another one considering all the time I put into it, lol. But luckily, for all the people out there who are as crazy about toadstools as I am, I had the presence of mind to write down the pattern as I was going along. So here it is, and if someone makes one of these and sends me pictures to prove it I will send you a 20% off coupon for my Etsy shop!


Materials:
Size G, 4.5 mm Crochet Hook
1 Skein each Red Heart Classic Acrylic Yarn in Red, Black, and Off-White (This really doesn't use a whole skein of yarn; if you have some good-size leftover balls they should be fine.)
1 Sheet White Craft Felt
Off-White or Grey Embroidery Thread
Batting
Tacky Glue
Handfull of Weights (I like to use the inexpensive glass pebbles found in the floral department at craft stores.)

Abbreviations:
rnd - Round
ch - Chain
sc - Single Crochet
slst - Slip Stitch
dec - Decrease

Rnd 1: Beginning with the red yarn, start your first round with a magic loop, then crochet 6 sc into the loop, join to the first sc with a slst, and pull the loop tight. (6 sc) We will not be joining the other rounds; just work them in a seamless spiral.

Rnd 2: 2 sc in each sc around. (12 sc)
Rnd 3: *1 sc in first sc, 2 sc in next.* Repeat around. (18 sc)
Rnd 4: *1 sc in first 2 sc, 2 sc in next.* Repeat around. (24 sc)
Rnd 5: *1 sc in first 3 sc, 2 sc in next.* Repeat around. (30 sc)
Rnd 6: *1 sc in first 4 sc, 2 sc in next.* Repeat around. (36 sc)
Rnd 7: *1 sc in first 5 sc, 2 sc in next.* Repeat around. (42 sc)

Rnds 8 - 21: By now you should be seeing the pattern. Keep increasing by 6 evenly-spaced stitches each round until you have 126 sc. If you would like to know a bit more about this increasing technique, check out my crochet-in-the-round tutorial here.

Rnds 22 - 23: 1 sc in each sc around. The cap will form naturally, just push it out with your hands to make it rounder.

Rnd  24: Switch to the black yarn, and do 1 sc into the back loop only of each sc around.

Rnd  25: *1 sc in first 19 sc, dec 1 sc* Repeat around. (120 sc)
Rnd  26: *1 sc in first 18 sc, dec 1 sc* Repeat around. (114 sc)
Rnd  27: *1 sc in first 17 sc, dec 1 sc* Repeat around. (108 sc)
Rnd  28: *1 sc in first 16 sc, dec 1 sc* Repeat around. (102 sc)
Rnd  29: *1 sc in first 15 sc, dec 1 sc* Repeat around. (96 sc)

Rnds 30-40: Continue the same decrease pattern, taking away 6 sts every round until you end up with an opening about 2 1/2 inches in diameter (30 sc).

Now you should stuff the cap of the mushroom. Be sure to stuff it tightly and make it nice and round.

Rnd  41: Switch to the off-white yarn, and do 1 sc into the front loop only of each sc around.

Rnds 42 - 48: 1 sc in each sc around.
Rnd  49: *1 sc in next sc, 2 sc in next* Repeat around (45 sc)
Rnds 50 - 52: 1 sc in each sc around.
Rnd  53: *1 sc in next 5 sc, 2 sc in next* Repeat around. (54 sc)
Rnds 54 - 58: 1 sc in each sc around.
Rnds 59 - 60: *1sc in next 5 sc, dec 1 sc* Repeat around (36 sc)

Rnd  61: 1sc into the back loop only of each sc around.

Rnd  62: *1 sc in next 5 sc, dec 1 sc* Repeat around (30 sc)
Rnd  63: *1 sc in next 4 sc, dec 1 sc* Repeat around (24 sc)
Rnd  64: *1 sc in next 3 sc, dec 1 sc* Repeat around (18 sc)

About here is where you should start pouring the little weights into the stem. I filled the entire stem with them because the top is so heavy, and it sits very nicely. Keep filling the stem as much as possible as you work the last few rounds.

Rnd  65: *1 sc in next 2 sc, dec 1 sc* Repeat around (12 sc)
Rnd  66: *1 sc in next sc, dec 1 sc* Repeat around (6 sc)
Rnd  67: *1 sc in next sc, dec 1 sc* Repeat around (3 sc)

Stitch up the remaining hole and hide the knot, and weave the end of the yarn into the stem.


To make the dots for the top, cut circles of varying sizes out of the white craft felt and do a simple blanket stitch around the edge with the embroidery thread. Use the tacky glue to attach the dots to the cap in a pleasing pattern and let dry. Voila!

If you have found this or any of my other free patterns useful and would like to help me keep creating them I accept PayPal donations!

8/02/2011

How-Tuesday #23!

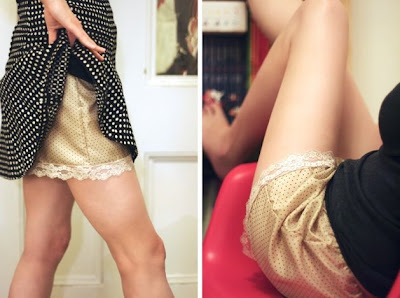
Happy How-Tuesday! I almost missed it this week, but here we go: we have tap pants, bangles, and a bombe! Enjoy.


These tap pants are super cute and look very easy to make. I have been meaning to expand my collection of slip-like undergarments. Here is how to make them.


These bracelets are inspired by expensive designer ones and are super easy! I am going to make a ton of them! Here is the tutorial.


Oh Martha, you have done it again. A banana split bombe that looks too good to eat! Here is the recipe.