How to Quilt
This is a post about your first quilt. Yes, you. I've had so many of my friends look at me as I'm binding a quilt and lament, "I wish I knew how to quilt." I used to say the very same thing. And while I don't claim to be any kind of expert as I've only completed a couple of baby quilts thus far, I know that anyone who can sew a straight line can also make a quilt.
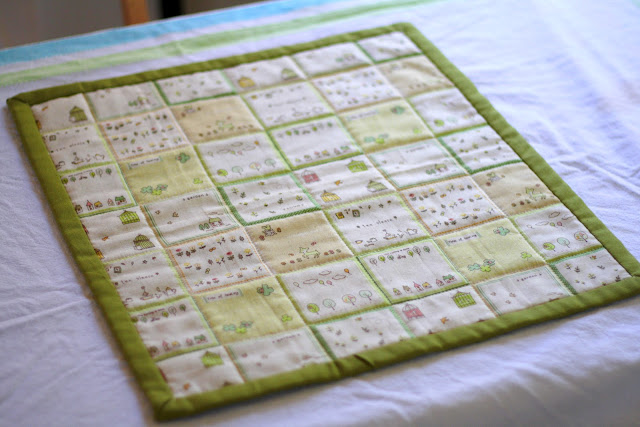
My mom recently came to visit me and we were going through some of my fabrics when she fell in love with a fat quarter of a sweet Japanese cotton/linen blend printed in neat little squares to look like patchwork. She asked me to quilt it up so she could use it as a table mat. As I was about to begin I grabbed the camera and documented it all. Four hours later I had a beautiful little quilt, and a tutorial.
I hope all of my readers out there who have always been too intimidated to try quilting will give this a try. Half a day and a few simple materials is all it takes, and you can take what you learned and move on to the next level.
Quilted Table Mat
Materials:
1 fat quarter of a patchwork-like print
1 fat quarter of needle-punch weight cotton batting (if you don't want to buy batting you can use two layers of inexpensive craft felt instead)
1 fat quarter plus 1/4 yard of a coordinating solid fabric (or if you only have a fat quarter you can get some wide double-fold bias tape instead of making it yourself)
Coordinating thread
1. Take your solid cotton quarter and lay it out, then put down your batting, then the top. Pin all the layers together (you don't have to use a lot of pins).
2. If you have a walking foot for your machine, now's the time to use it. I don't have one - instead I just make sure to hold the top fabric taught as I sew to avoid puckering. Also be sure to take out any pins that are close to where you're sewing as you go. You don't have to back stitch at the beginning or end of a row since they'll be encased in the binding later. Do every row of stitching from top to bottom first, starting from the middle line and working your way out to the edges, then turn the work and repeat.
3. That's all there is to the actual quilting part of this. I told you it was easy! For your next quilt, sew some squares of fabric together and do the same thing.
Now comes the more technical part of binding the quilt. If you bought double-fold bias tape then you can skip this section and go straight to the blind-stitch, but I encourage you to make your own binding. It's fun, more economical, and you can get a perfect match.
Take your extra quarter yard of fabric and cut it lengthwise into 3-inch wide strips.
Now, bias tape is called such because it is cut from fabric "on the bias", i.e. at a 45 degree angle to the grain. You'll want to do this when you are using most patterned fabrics, especially stripes or anything printed in rows, so the pattern is all over the binding. I tend to make my bindings out of solids or non-linear designs just so I don't have to bother cutting on the bias.
Anywho, once you have your strips, you're going to want to join them at an angle so your binding won't be lumpy. Take two strips and line their ends up, right sides facing, at a right angle. It'll look like this:
4. When you've got the pieces to this state take a moment to make sure you're going to be sewing it correctly. You want to sew from corner to corner to create a diagonal seam between the two pieces when you open them. If you sew in the wrong direction you'll definitely be able to tell when you try to unfold it. Pin the pieces together and then unfold it briefly just to make sure you end up with a nice continuous strip.
5. Sew diagonally from corner to corner:
6. (Yes, yes, I know: never sew over pins. I'm a rebel like that.) Trim the corner off, after making sure you sewed it correctly of course.
7. Press the seam open on the back, then turn the binding over and press it again.
8. Et voila! Connect the rest of your strips the same way until you have one long piece.
9. Now start pinning the binding to the edge of your quilt. Just line the edges up and pin along. When you get to the corner, put the last pin about an inch away from the edge:
10. Take the binding to the edge, then hold the corner and turn it at a right angle, and put a pin about an inch away:
11. After you've finished pinning the entire binding around, you need to deal with the place where they meet. Take the lower layer (the one that will have its edge showing when you turn the binding over), and fold its edge back at an angle and press it with an iron. We're trying to mimic the angled seams of the rest of the binding.
12. Lay the other layer of binding over the top and trim it. Keep it long enough to cover the layer below it, and pin both layers in place. Now you can start stitching the binding on.
13. You want to sew the binding on with just under 3/4 of an inch of seam allowance. This, on most sewing machines, in the line marked 16.
(We're basically making double-fold bias tape, but since I have a bit of an aversion to ironing, and ironing a long thin strip is kind of a pain for anyone, this is an easy way to do it. Your seam allowance will depend on how wide you cut your strips, and will be about the same as how wide it ends up being on the front and back. Since my strips were 3 inches wide, divided by four [the two allowances and the front and back] it's 3/4 of an inch. That's the seam allowance and the width of the binding. I say sew it just under the correct seam allowance to account for the width of the quilt itself, which is about an eighth of an inch. If you like the binding thinner, say, half an inch, you'd cut a 2-inch strip and sew it with a 1/2 inch allowance. If you want it wider, cut the strip wider and sew it with a wider allowance. I hope that makes sense.)
14. Anywho, start sewing the binding on near the overlapping ends, and when you reach the first corner, take out the pin facing you...
... and get the corner fold out of the way of the presser foot:
15. Sew until you come to the last pin you placed about an inch from the corner, back-stitch and take the piece out of the machine.
16. Now fold the corner flap back, over where you sewed, and be sure to get the bottom layer of binding out of the way of where you'll be sewing on this edge:
17. Start sewing about an inch away from the corner:
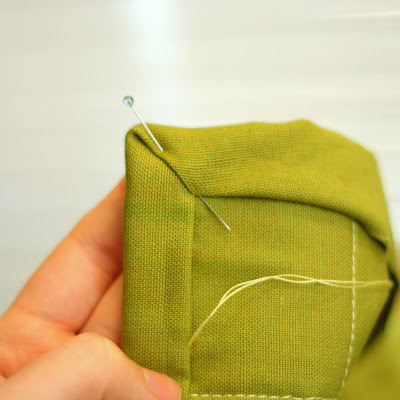
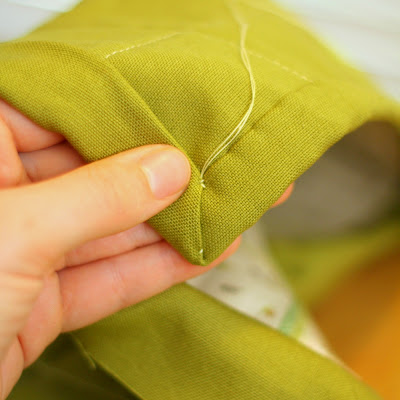
18. Sew all the way around and do all the corners the same way. When you're done, the back of the corners should look like this:
And when you turn the corners inside-out, the magic happens...
Boop! A mitered corner!
19. Turn out all the corners and fold the binding out. Press the sides with an iron, but avoid pressing the corners.
20. Now you just have to fold the binding over and hand-sew the back. Start at the point where the binding begins and ends:
And place a pin in the seam to keep everything together:
21. Flip the quilt over. You're going to fold the raw edge of the binding inside and line the fold up so it slightly overlaps the stitching around the border and pin it in place:
22. Fold over the outer layer of the seam as well, wrapping it around the inner layer, and pin it in place.
23. Start folding the binding in on itself and pinning it in place, making sure to just barely cover the row of stitching:
24. Thread your needle (you should use a matching thread for this, but for visibility in the tutorial I'll use the quilting thread), tie a knot in the end, and sew up through the back of the binding, being sure to go through all the layers:
25. Stitch over the seam to secure it, then stitch down the seam of the binding to the back fabric, only picking up a few threads of it in the stitch, and make sure you only go through the layer of solid fabric, not through the front fabric as well:
26. There are quite a few different techniques out there to sew on a quilt binding. I prefer using an encased blind stitch. It just seems to be the neatest and strongest stitch, but I'll show you two ways to do it, and you can figure out which you like best. The first way is to insert your needle back into the edge of the binding, straight across from where your thread is coming out of the backing, and let the needle travel down a scant 1/4 inch or so inside the fold of the binding, coming back out along the fold:
Then you pick up just 2-3 threads of the back fabric, just across from where your needle came out of the fold:
And then insert you needle back into the fold very close to the place you exited, and travel down inside the fold as before:
You keep repeating this stitch pattern and removing the pins holding down the binding as you go, and you will get some nice, strong, invisible stitches to keep your binding down:
27. The other method of blind stitching is very much the same, except instead of traveling inside the fold of the binding, you travel inside the back fabric. You just need to make sure not to go through the front side, as always, and when you come out down the line you pick up a couple stitches of the binding's fold, and travel back inside the back fabric:
28. I prefer the second method as it feels like a much smoother motion, and there's really no difference in the look of the stitches. In this photo, my thumb is where I switched methods, and you really can't tell either way:
29. Anywho, once you've mastered the blind stitch (and if you're still having trouble there are some really good video tutorials on YouTube as always), and you've sewn up to a corner, fold the binding in on itself as you have been doing, all the way to the edge, which will look like this:
30. Now fold the top part down, and tuck the binding on the next edge under as you have been, and you should get another nice mitered corner:
31. Pin the corner in place, and stitch right up to it, with your last stitch coming out right near the seam:
32. Now stitch over the seam, poking your needle all the way through to the other side of the quilt, making sure it comes out close to the same seam on the opposite side:
33. Stitch over this front seam and back through the quilt, making sure the needle comes out near where you started stitching:
34. Repeat these steps 2-3 times, until you feel like the bottom of the corner is secure. On your last round, instead of putting your needle back through to the back of the quilt, travel it through the fold of the corner to the top, coming out close to the seam (be sure you're inside the fold, not just under it):
35. Stitch across the seam, sticking your needle through to the back just like you did at the bottom of the corner:
36. Stitch through a few times, and when you're satisfied that the top of the corner is secure, on your last stitch instead of going back to the front, travel inside the fold again, coming out on the left of the seam so you can continue your usual blind stitching on the binding.
You know all you need to finish the quilt now! Just keep blind stitching around the border and securing the corners when you come to them. When you reach the end, tie a small knot close to your last stitch, and pull the knot under the binding seam to hide it.


Great tutorial! That mitered corner is the slickest thing - I'm going to try that!
ReplyDeleteI love my little quilt...thanks Chase :) mom
ReplyDeleteSomeday I'll quilt, really I will! This looked quick and easy (and very well-made)! Thanks!
ReplyDeleteSo, so lovely! I've made three large, bed-sized quilts (many years ago) but simply don't have the patience or time for that anymore. I never thought to downsize the project and make charming little mats like this. They seem so much more realistic to complete! Fantastic and inspiring tutorial, I want to go out and buy new fabric right now.
ReplyDeleteIts ok my tutorial is for a baby quilt and may never get done because I'm lazy.
ReplyDeleteOooh I really hope you all give it a go. I have yet to finish a large quilt, partly because my machine is too small to quilt the one I have pieced together, and also because I'm lazy lol. But baby quilts are awesome and I've been meaning to do more tiny projects like this. Place mats are next on the list, then maybe a quilted handbag!
ReplyDeleteQuilted handbag ... I want one :(
ReplyDeleteThis is such an amazing tutorial. Fantastic detail and great photos! It given me an urge to make a tiny quilt just so I can follow your binding instructions. :)
ReplyDeleteWhere did you get your fabric!?!? I have a hard time finding cute, Japanese prints. I want to use this tutorial to make placemats~
ReplyDelete