Fancy Unlined Curtain Tutorial
Alright, so I know you all have noticed that I have not been very present recently, but I have a good excuse! (And hey, at least I have been keeping up with my How-Tuesday posts, which amazes me. But I just realized, since I number each one, that it has been just shy of 4 months since I have made a true post.)
Aaaanywho, I have been distracted because... Dennis and I moved house! That's right, a brand-spankin' new, absolutely smashing apartment, with just us and our two cats, and oh what a time I have had nesting and making it feel like home! The move has been the center of my universe since April, and we just had our epic housewarming party (Pictures and recipes coming soon!), so things are now officially back to normal and I can pick up where I left off.
So now that I have a lot of cool stuff to show off, and I have been making a few super-quick pieces for the house (though I am still committed to not starting any new projects, but projects for me are defined as something that I cannot start and finish in the same day), I figured I would kick off the house tour with a new sewing project tutorial!
Some of you may remember this project, where I turned our old printer stand into a little bar for Dennis with the addition of a curtain. I have made a few curtains like it in my time, but it seems like every time I go to make one I have forgotten my method. So when I needed to make one for a little space in our new place I decided to document the process and post it on here so no one else will have to do the old trial-and-error method (which I had to do a bit of to complete this project).

First off, the space that I needed this curtain for is a storage space under our upper neighbors stairs, where we keep all of our containers of holiday decorations. There is a tiny door in our hallway, about 20x40 inches, with a substantial little room behind it. We decided this was the perfect place for the litter box too, since it is secluded and out of the way, plus there is a light in the room so we can see when we need to clean it.
But when we took the door off the hinge so the cats could have easy access the box was pretty visible, so Dennis suggested I make a little curtain. So without further ado, here is how you make a simple unlined curtain with a fancy bottom, and you can adapt the size to fit any opening or window you need to! Just takes a bit of simple math.

First we have a bit of measuring and math to do. Grab your fabric tape measure and measure the circumference around your tension rod (mine was 3 inches around). Also measure the length and width of the space the curtain will occupy (my space was 20x40 inches). Also measure the length of your yard of fabric, since sometimes they give you a little more (mine was 38 inches, a couple more than a yard).
To figure out your fabric dimensions from these measurements, first add together the circumference of your tension rod, plus the length of the desired curtain, and add 4 inches for seam allowance. (For my curtain, 3+40+4 came out to 47.) This will be the complete length of the panel you want after piecing on the bottom.
Now, subtract the length of your yard of the main fabric (38 inches) from this number (mine came to 9 inches). Add 2 inches for seam allowance, and this is the length of the bottom panels (11 inches).
Then take your desired curtain width (20 inches), divide it in half (10 inches) and multiply it by 1.5 (15 inches). Add 2 inches for seam allowance (17 inches). This is the width of each panel of main fabric and bottom fabric.
I hope that was not too confusing. After all that measuring and math we now know the dimensions of the 4 panels:
2 panels of the main fabric each measuring 38x17 inches, and 2 panels of the contrasting bottom fabric each measuring 11x17 inches.
From this I was able to figure out how much fabric to buy. If you were going to use this tutorial to make larger curtains, for say a window, you will obviously need much more fabric. If you take your raw dimensions in to the fabric store usually there is someone there to help you figure out the yardage you will need.

When I have to cut across an entire length of fabric, I find it easiest to fold it up lengthwise and use my rotary cutter and cutting mat. Just fold it up and cut 2 (17 inch) panels. Also cut out the bottom fabric panels now.

Alrighty, now we can start sewing. First, pin together the top and bottom fabric panels, right sides facing, along their width. Stitch them together with a 1/2 inch seam allowance and then zigzag or surge over the exposed edge as this is the only seam that will not be rolled.

Open the panel up and press the seam flat, pointing toward the bottom of the curtain:

Here is how it looks from the front:


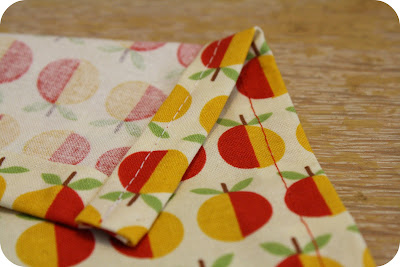
You need to do rolled hems on all the sides for the next few steps, so here is how I do them:
First fold over the edge of the fabric just a bit shy of 1/2 an inch and iron it flat. It is okay if it is not perfect:

Then fold the fabric over again, this time making sure it is a straight half inch wide. Pin it down, then press it with an iron. It is easy to do this with a linear-patterned fabric (so long as you squared up the panel using the pattern as a guide), because once you figure out where a 1/2 inch comes to, you can just follow the line:

Do a 1/2 inch rolled hem on both edges of the panel, and stitch them down with a 3/8 inch seam allowance. Also do a rolled hem on the top edge, pin it and press it, but do not stitch it yet.Leave the bottom un-hemmed for now.
Now for a teensy bit more math. To figure out how far to fold down the top of the panel to make the channel for the tension rod, add together 1/2 the circumference of the rod plus 5/8 inches for seams, plus 1/2 inch for play. (Mine is 1.5+ 5/8+1/2 inches, which comes out to 2 5/8 inches.)

Stitch the channel in place with two seams: one 1/4 inch, and one 5/8 inch:

Now you can put the curtain on the rod and fit it into the space. We left the bottom un-hemmed so that you could make sure it is the correct length. Its really annoying to hem it and then realize it is too long and hem it again. So hang it and mark where you want it hemmed, take it back to the machine and do a 1/2 inch rolled hem on the bottom with a 3/8 inch seam allowance.
Aaaanywho, I have been distracted because... Dennis and I moved house! That's right, a brand-spankin' new, absolutely smashing apartment, with just us and our two cats, and oh what a time I have had nesting and making it feel like home! The move has been the center of my universe since April, and we just had our epic housewarming party (Pictures and recipes coming soon!), so things are now officially back to normal and I can pick up where I left off.
So now that I have a lot of cool stuff to show off, and I have been making a few super-quick pieces for the house (though I am still committed to not starting any new projects, but projects for me are defined as something that I cannot start and finish in the same day), I figured I would kick off the house tour with a new sewing project tutorial!
Some of you may remember this project, where I turned our old printer stand into a little bar for Dennis with the addition of a curtain. I have made a few curtains like it in my time, but it seems like every time I go to make one I have forgotten my method. So when I needed to make one for a little space in our new place I decided to document the process and post it on here so no one else will have to do the old trial-and-error method (which I had to do a bit of to complete this project).

First off, the space that I needed this curtain for is a storage space under our upper neighbors stairs, where we keep all of our containers of holiday decorations. There is a tiny door in our hallway, about 20x40 inches, with a substantial little room behind it. We decided this was the perfect place for the litter box too, since it is secluded and out of the way, plus there is a light in the room so we can see when we need to clean it.
But when we took the door off the hinge so the cats could have easy access the box was pretty visible, so Dennis suggested I make a little curtain. So without further ado, here is how you make a simple unlined curtain with a fancy bottom, and you can adapt the size to fit any opening or window you need to! Just takes a bit of simple math.
Fancy Unlined Curtain:

Materials:
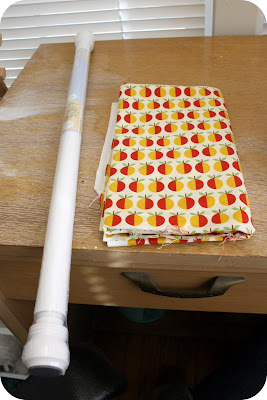
1 tension rod (available at most big box stores in the shower curtain aisle, grab one that will fit your space)
1 yard of main fabric, and 1/2 yard of another coordinating fabric. (This is enough to make a slightly ruffled curtain to fit a 20x40 inch space. If you want to increase the size, look over the steps about measuring and you can figure out how much you will need.)
Coordinating thread, an iron and ironing board, a rotary cutter, straight edge, and cutting mat, fabric tape measure, and a sewing machine are all required as well.

First we have a bit of measuring and math to do. Grab your fabric tape measure and measure the circumference around your tension rod (mine was 3 inches around). Also measure the length and width of the space the curtain will occupy (my space was 20x40 inches). Also measure the length of your yard of fabric, since sometimes they give you a little more (mine was 38 inches, a couple more than a yard).
To figure out your fabric dimensions from these measurements, first add together the circumference of your tension rod, plus the length of the desired curtain, and add 4 inches for seam allowance. (For my curtain, 3+40+4 came out to 47.) This will be the complete length of the panel you want after piecing on the bottom.
Now, subtract the length of your yard of the main fabric (38 inches) from this number (mine came to 9 inches). Add 2 inches for seam allowance, and this is the length of the bottom panels (11 inches).
Then take your desired curtain width (20 inches), divide it in half (10 inches) and multiply it by 1.5 (15 inches). Add 2 inches for seam allowance (17 inches). This is the width of each panel of main fabric and bottom fabric.
I hope that was not too confusing. After all that measuring and math we now know the dimensions of the 4 panels:
2 panels of the main fabric each measuring 38x17 inches, and 2 panels of the contrasting bottom fabric each measuring 11x17 inches.
From this I was able to figure out how much fabric to buy. If you were going to use this tutorial to make larger curtains, for say a window, you will obviously need much more fabric. If you take your raw dimensions in to the fabric store usually there is someone there to help you figure out the yardage you will need.

When I have to cut across an entire length of fabric, I find it easiest to fold it up lengthwise and use my rotary cutter and cutting mat. Just fold it up and cut 2 (17 inch) panels. Also cut out the bottom fabric panels now.

Alrighty, now we can start sewing. First, pin together the top and bottom fabric panels, right sides facing, along their width. Stitch them together with a 1/2 inch seam allowance and then zigzag or surge over the exposed edge as this is the only seam that will not be rolled.

Open the panel up and press the seam flat, pointing toward the bottom of the curtain:

Here is how it looks from the front:

Now top stitch 3/8 of an inch below the seam:

You need to do rolled hems on all the sides for the next few steps, so here is how I do them:
First fold over the edge of the fabric just a bit shy of 1/2 an inch and iron it flat. It is okay if it is not perfect:

Then fold the fabric over again, this time making sure it is a straight half inch wide. Pin it down, then press it with an iron. It is easy to do this with a linear-patterned fabric (so long as you squared up the panel using the pattern as a guide), because once you figure out where a 1/2 inch comes to, you can just follow the line:

Do a 1/2 inch rolled hem on both edges of the panel, and stitch them down with a 3/8 inch seam allowance. Also do a rolled hem on the top edge, pin it and press it, but do not stitch it yet.Leave the bottom un-hemmed for now.

Now for a teensy bit more math. To figure out how far to fold down the top of the panel to make the channel for the tension rod, add together 1/2 the circumference of the rod plus 5/8 inches for seams, plus 1/2 inch for play. (Mine is 1.5+ 5/8+1/2 inches, which comes out to 2 5/8 inches.)

Stitch the channel in place with two seams: one 1/4 inch, and one 5/8 inch:

Now you can put the curtain on the rod and fit it into the space. We left the bottom un-hemmed so that you could make sure it is the correct length. Its really annoying to hem it and then realize it is too long and hem it again. So hang it and mark where you want it hemmed, take it back to the machine and do a 1/2 inch rolled hem on the bottom with a 3/8 inch seam allowance.
Now you just have to repeat all the steps with the other two panel pieces and you are set! I hope this takes some of the headaches out of curtain making for you guys. I would love to see any finished projects made from this!
If you have found this or any of my other free patterns useful and would like to help me keep creating them I accept PayPal donations!
hi chase... this turned out great ...look really pro! m
ReplyDeleteSweet, I need to make similarly sized curtains for my bedroom, this will definitely come in handy.
ReplyDelete