Meet Domo, the amigurumi robot!

He's all hand crocheted in single crochet out of acrylic worsted weight yarn. He's the biggest stuffie I've ever made, he came out bigger than I thought cause I used a big hook to get him done faster, and I freehanded the entire pattern. My first pattern was my amigurumi acorn, and man what a jump to a giant and fairly complicated robot. Here's a pic of him with a big soda bottle for size reference.
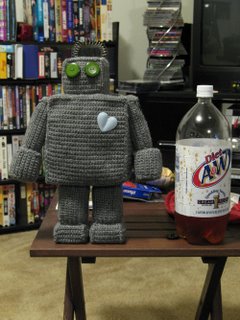 Over a foot tall easy.
I named him Domo because it means something along the lines of "very much" in Japanese, a reference to how big he is and how long it took me to make him. I'm so in love with him! His feet and legs are weighted so he stands on his own, and his arms are jointed with a button for mobility. 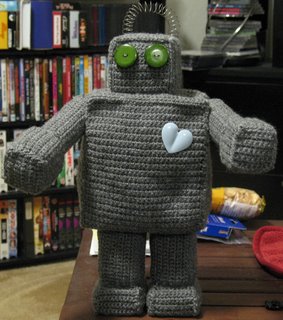 I wanted to make him some stuffed buildings to play with but I didn't have the time tonight, so I'll post them later on. He's my first robot, and I'm quite proud of him. He's so cuddly! The embelishments are all on there securely with tacky glue and thread, so it's kid friendly. Hope y'all like him, thanks for looking! Oh, and here's me in the process of making him!
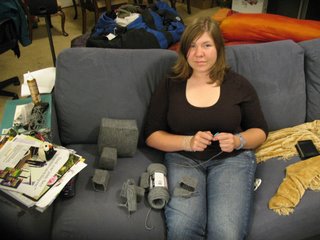


Your pics aren't working! Boo!
ReplyDeleteWHAT A GREAT ROBOT...YOUR GOOD!
ReplyDeletecute! I want to attempt similar for a friend's son... if you have any tips or suggestions I would be grateful!
ReplyDeletepamelamama/gmail
Thanks!
:D
Well, the basic parts of domo are simple to construct. I don't have a pattern, but here's how I did it:
ReplyDelete(Let's say we're making his head.)
1. Chain as many stitches as necessary for your desired width. Then single crochet as many rows as it takes to achieve desired height. You should have a square/rectangle.
2. Turn and single crochet in the front loop only of the next row, this should help give you a nice corner. SC as usual the same number of stitches as before.
3. Repeat step 2 two more times, and you should have the makings of a square tube thingy (?). Join the ends together with a slip stitch or by sewing with yarn.
4. Now make the sides of the box by chaining the # of stitches in height (you may need to adjust the number of stitches, it takes some guess work/eye-balling), and sc until you have a square to cover one end of the tubey thing. Sew/slip stitch into place.
5. Make another square and sew half way onto box, stuff your cube/rectangle and sew the rest of the way.
And voila, you have domo's head (I think I started with a chain 15 or 20, I don't remember). All it takes to make the other parts is adjusting the beginning chain for the width of the pieces and the number of rows for the height, but the method to make a square is the same. All he needs after that is some buttons for personality and movement. I used a long piece of wire to sew thru the body and affix the arms so they are moveable, and I'm still working on his three little building playmates, made using the same method. And a word of warning, if you make one as big as him you're in for a lot of work, trust me.
Wow, I sure hope that helps!!