Finally...


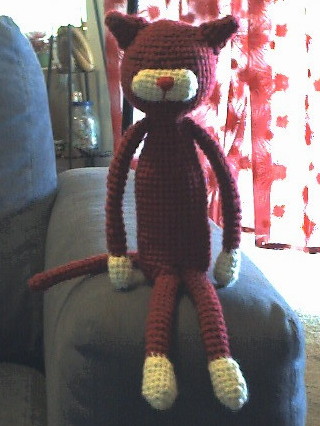
Man, I've been working on this amineko for an eternity. He's been sitting on the coffee table with no legs or tail for god knows how long. but I saw that there was an amineko-along on craftster, so I thought I'd finish him up and put him on here so I could link it. He's sooo cute! And he's easily poseable for cute pictures. As soon as I get a better digital camera I'm going to redo my pictures on here and then take him outside and do some cute stuff. The pattern posted here is the one off of the craftster forum that was translated from the origional japanese one. I didn't change a single thing and I think it turned out really well:

Rnd (Rnds) = Round, SC = single crochet, SLST = slip stitch, INC = increase (+1 sc), DEC = decrease(-1 sc).
Head (make 1):
Rnd 1 : make 6 sc into a ring, join w/ a slst to first sc. (6 sts)
Rnd 2 : sc inc each st. (12 sts)
Rnd 3 : sc inc in every 2nd st. (18 sts)
Rnd 4 : sc inc in every 3rd st. (24 sts)
Rnd 5 : sc inc in every 4th st. (30 sts)
Rnd 6 : sc inc in every 5th st. (36 sts)
Rnd 7 : sc inc in every 6th st. (42 sts)
Rnd 8: sc inc in every 7th st. (48 sts)
Rnds 9 - 15: work even. (48 sts)
Rnd 16: dec in every 7th st. (42 sts)
Rnd 17: dec in every 6th st. (36 sts)
Rnd 18 : dec in every 5th st. (30 sts)
Rnd 19: dec in every 4th st. (24 sts)
Rnd 20: dec in every 3rd st. (18 sts)
Body (make 1):
Rnd 1 : make 6 sc into a ring, join w/ a slst to first sc. (6 sts)
Rnd 2 : sc inc each st. (12 sts)
Rnd 3 : sc inc in every 2nd st. (18 sts)
Rnd 4 : sc inc in every 3rd st. (24 sts)
Rnd 5 : sc inc in every 4th st. (30 sts)
Rnd 6 : sc inc in every 5th st. (36 sts)
Rnds 7 - 23: work even. (36 sts)
Rnd 24: dec in every 5th st. (30 sts)
Rnds 25 - 26: work even. (30 sts)
Rnd 27: dec in every 4th st. (24 sts)
Rnd 28 -29: work even. (24 sts)
Rnd 30: dec in every 3rd st. (18 sts)
Rnds 31 -32: work even. (18 sts)
Arms (make 2):
Rnd 1 : make 6 sc into a ring, join w/ a slst to first sc. (6 sts)
Rnd 2 : sc inc each st. (12 sts)
Rnds 3 - 6 : work even. (12 sts)
Rnd 7: dec in every 3rd st. (9 sts)
Note: pattern says 8 sts left, I get 9.
Rnds 8 - 28: work even. (9 sts)
Legs (make 2):
Rnd 1 : make 6 sc into a ring, join w/ a slst to first sc. (6 sts)
Rnd 2 : sc inc each st. (12 sts)
Rnd 3: sc inc every 4th sts. (15 sts)
Rnds 4 - 7: work even. (15 sts)
Rnd 8: dec every 3rd st. (11 sts)
Note: pattern says 10 sts left, I get 11.
Rnds 9 - 24: work even. (11 sts)
Tail (make 1):
Rnd 1 : make 6 sc into a ring, join w/ a slst to first sc. (6 sts)
Rnd 2 : sc inc every 3rd st. (8 sts)
Rnds 3 - 22: work even. (8 sts)
Ears (make 2):
Rnd 1: make 4 sc into a ring, join w/ a slst to first sc. (4 sts)
Rnd 2 : sc inc each st. (8 sts)
Rnd 3: sc inc every 4th st. (10 sts)
Rnd 4: sc inc every 5th st. (12 sts)
Rnd 5: sc inc every 6th st. (14 sts)
Muzzle (make 1) : Note: it seems long, but it gets attached sideways to the face.
Rnd 1 : make 7 sc into a ring, join w/ a sl st to first sc. (7 sts)
Rnd 2 : sc inc each st. (14 sts)
Rnds 3 - 10: work even. (14 sts)
Rnd 11: sc dec next 3 sts, sc dec next 4 sts, sc dec next 3 sts, sc dec next 4 sts. (4 sts)
And you can get assembly instructions for putting him together here at the origional japanese site.


I think your kitty turned out beautifully and I LURVE the acorns.
ReplyDelete: )
Thanks so much for posting a comment. You're the first person I've never met whose liked my blog, so at least I know I'm not doing this for nothing! *does little happy dance*. If you end up making the acorns, I'd love to see them. And maybe you could link my blog for the pattern so it's not so quiet around here :).
ReplyDeletethis turned out great! i've made a dozen octopi beause it only involves going in a circle, but i think i finally must succumb to amineko- your kitty, and blog, are both lovely!
ReplyDeleteI love your blog and congrats on your first milk stuffie! I saw her stuff at the Renegade Craft Fair in Chicago and was just overwhelmed by the cutness! Anyhow, I was wondering much yarn the cats use? Would one skein be enought for the the main color/body?
ReplyDeleteOh yes, one skein is plenty enough for the whole cat. I had a ball of yarn that was partially used and I still have some left. I'll edit the post to include how much yarn you need. Thanks so much for saying something! :D
ReplyDeletewhat do all of the abreviations for your kitty instructions mean? i think he's absolutely adorable, and i want to make one, but i have no clue how..
ReplyDelete-nevada
Well, rnd stands for round, sc is a single crochet. Inc is short for increase and dec is short for decrease. If you're new to crochet and want a tutorial of how to do it (it's really easy once you get the hang of it), there are plenty of websites that can help you, and one of my favorites is the instruction directory on www.crochetpatterncentral.com (there's a link to it on my blog). Hope this helps!
ReplyDeletethis is so cute :) my moms a cat freak i'm going to make her one for christmas :D thanks for the awesome pattern!
ReplyDeleteThey're really cute. I'll finish mine soon and started to make arms and legs by now.
ReplyDeleteThe translation/additional information helped a lot, but there are two small mistakes in it.
Instead of arms: "Rnd 7: dec in every 3rd st." you'll have to decend in every 2nd st. Same goes for legs "Rnd 8: dec every 3rd st."
You'll get the correct amount of stitches. ^^
Bye.
Jaden
hello oh the Cuteness,
ReplyDeleteI am attempting to make the cat, but I am unable to get directions to putting it together it is not in english. Do you have any tips in how to get the directions in english?
The cat is soooooooooo cute, I am trying to make it for my grand-daughter for christmas.
This is adorable. I received the link from a member of the joyful toys group on yahoo. Her is the group addy: http://groups.yahoo.com/group/joyful-toys/
ReplyDeleteThis is a great group. I will also be linking to your website.
Cora
That kitty cat is delightful.
ReplyDeleteDMM
Great cat! Where can I find assembly directions in English? Not sure how to stuff this. Thanks!
ReplyDeleteI LOVE your kitty! I wish i had the talent to make it!
ReplyDeleteI have only crocheted a few things so far, but I LOVE cats and this one is so cute that I have to make one (or maybe one to represent each of my 3 cats :) Thanks!
ReplyDeleteHi! Your crochet projects are AWESOME!!! I was just wondering, do you have a YouTube account that gives step-by-step instructions for this particular project? A friend of mine wants me to make it and I'm a newbie...just wondering :-)
DeleteIn your instructions you say that weights are needed. Where are they placed and how heavy?
ReplyDeleteThe weights are meant to go in his bottom so he sits upright on his own. I use marbles or those little decorative glass bubbles, which you can find very inexpensively in the floral section of Michael's or Wal*Mart. I also put 2 of the weights in the paws so they hang down.
ReplyDeleteHi, I too love your kitty. I'm going to make one too. I saw the website for putting it together and it's not in english. Is there anywhere we can find it in english? You do wonderful work. Thanks for the pattern.
ReplyDeletelove ur cat
ReplyDeletedenise
I love your kitty. It's beautiful. Now I've to learn the technical words in English since I learnt it in French and have no idea how to read your manual. LOL!
ReplyDeleteAbout how tall does it stand- including legs?
ReplyDeleteI made this kitty for my grandmother. Your instructions are great, but it was hard to find the details for putting the piece together (since I don't read Japanese). I almost had a heart attack when I got to the end of the piece building and couldn't find how to get them together!
ReplyDeleteSo for anyone looking... here is where the instructions (in English) are to putting the pieces together.
http://www5a.biglobe.ne.jp/~mite/diagram/crochetedCat.html
First..the patter in adorable, thank you
ReplyDeleteBut, I couldn't find the instructions for the nose. can you explain the nose thingy?
thank you
This cat is so cute, thanks for posting it! This is my second "animal" project and it's going well so far! Lynn
ReplyDeleteHi At the point:)
ReplyDeleteso very cute! i made one and it is very cute!
ReplyDeleteI just bought the Amineko book by Nekoyama and was looking online for some clarifications of her instructions and found your site with the same crocheted kitty and instructions ... I thought Nekoyama originted the pattern?
ReplyDeleteYou certainly don't have to post this but I would appreciate some help from someone about the instruction for the torso when it says "sc inc in every 2, 3, 4t st etc)
for the head she says "2sc inc in every 2nd st" - and that makes more sense to me than "sc inc ..." what does that mean?
thank you
Nekoyama did indeed originate the pattern. The story behind the one on my blog is that back in college I couldn't afford to buy the book so I assembled the pattern myself after studying photos of the finished cats and one blurry photo of some of the Japanese charts. I'm not sure if mine is exactly the same as theirs, but it comes out nicely.
ReplyDeleteIn answer to your question, when the pattern says "sc inc" it means that you want to do 2 sc in the same stitch, i.e. the standard increase method. "sc inc in every 4th stitch", for example, means you do 3 single crochets and in the 4th stitch you do 2. I hope that helps!
Also someone was asking about the nose: after you finish the "muzzle" piece of the pattern you embroider the nose and mouth on with a satin stitch.
i LOVE THIS CAT ! OK in a comment from Jaden,he/she said u make a couple mistakes on the arms and legs on increasing...is that false or true?... Instead of arms: "Rnd 7: dec in every 3rd st." you'll have to decend in every 2nd st. Same goes for legs "Rnd 8: dec every 3rd st."
ReplyDeleteYou'll get the correct amount of stitches. ^^ ....HELP !
Either way will work just fine, mine has slightly thicker limbs because of my mis-translation, but it does no harm!
DeleteGracias x compartir eres una reina 😍
ReplyDeleteI am making one right now (in bright green)... so far I have the head, body, arms and am jumping ahead to the tail (making it longer than the pattern suggests). So far so good! ������
ReplyDeleteHi there ... I have the Nekoyama pattern and started on the head, but found I didnn't really understand what she means by a decrease (not a very experienced crocheter!). There seem to be two kinds of decreasing - one quite complicated, and one where you just skip one. Which one does this pattern use? Renee
ReplyDeleteI just skip one!
DeleteWhat's the measurement of the finished kitty?
ReplyDeleteI know this is a long time ago but i am not sure what row to add the eyes..can you let me know
ReplyDeleteHow is he poseable what makes him stay in the position you put it in
ReplyDeleteSo how does he stay in the position you put him in does he have wires in him please let me know ty
ReplyDelete